Step by Step Tutorial on Creating class in SAP ABAP Class Builder(SE24)
Step by Step Tutorial on Creating a class in SAP ABAP Class Builder(SE24)
This Tutorial will explain to you, How to create a Class in the SAP ABAP and Class Methods and Class Attributes and defining source code in the Class Builder (SE24). Here learn About Class in Object-Oriented Programming.
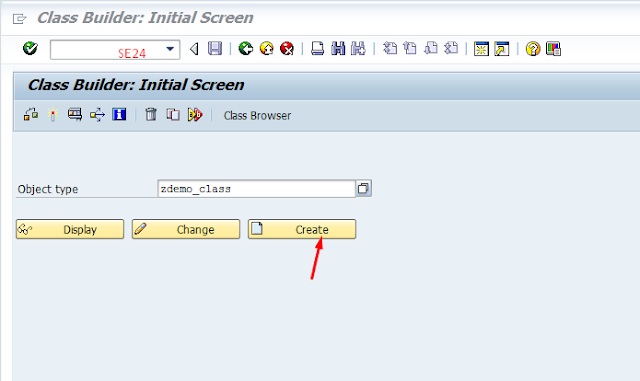
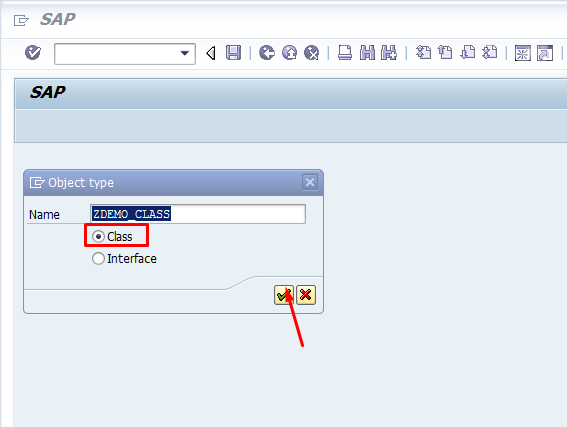
- Go to SAP Easy Access Screen where enter the SE24(Class Builder) Transaction Code.
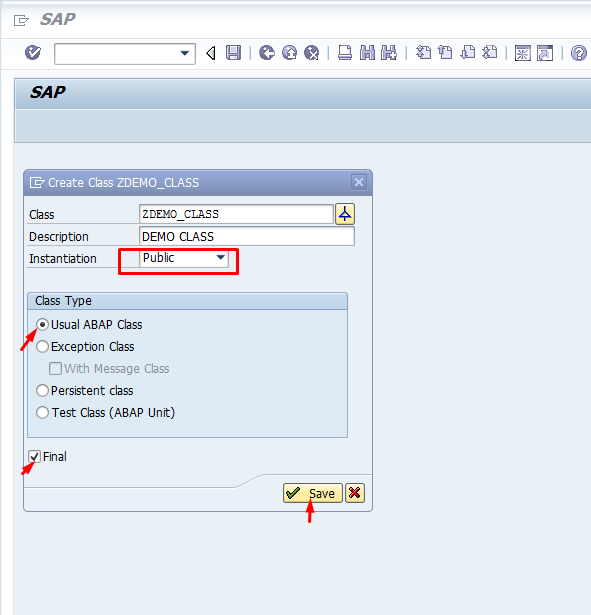
Select Public Instantiation and select the usual ABAP class radio button.
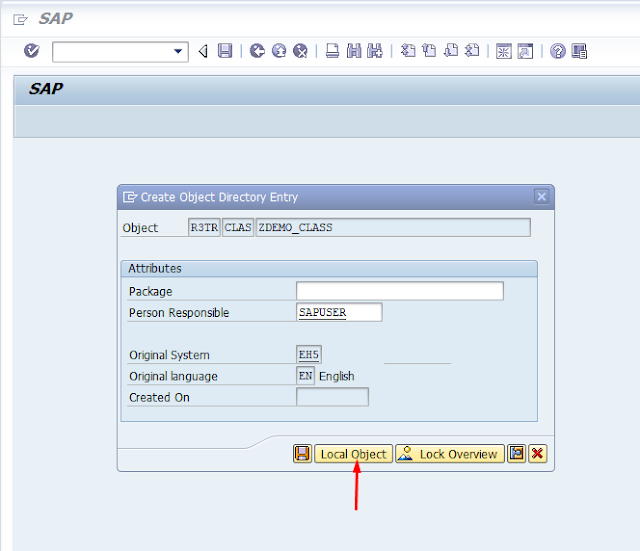
Save it as a Local Object.
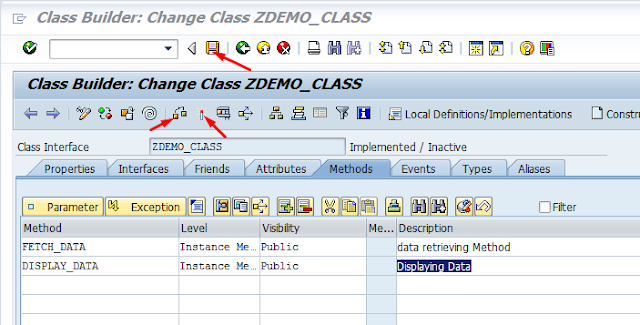
Click Methods Tab and define methods.
Click on Attributes Tab and crate variables, types.
Click on Save, Check and Activate.
To implement methods, select method and click on code button where define source code.
To view the source code, click the Source code based button.
class ZDEMO_CLASS definition
public
final
create public .
public section.
*"* public components of class ZDEMO_CLASS
*"* do not include other source files here!!!
Data it_ekko type table of ekko.
methods FETCH_DATA .
methods DISPLAY_DATA .
protected section.
*"* protected components of class ZDEMO_CLASS
*"* do not include other source files here!!!
private section.
*"* private components of class ZDEMO_CLASS
*"* do not include other source files here!!!
ENDCLASS.
CLASS ZDEMO_CLASS IMPLEMENTATION.
* <SIGNATURE>---------------------------------------------------------------------------------------+
* | Instance Public Method ZDEMO_CLASS->DISPLAY_DATA
* +-------------------------------------------------------------------------------------------------+
* +--------------------------------------------------------------------------------------</SIGNATURE>
method DISPLAY_DATA.
CALL FUNCTION 'REUSE_ALV_GRID_DISPLAY'
EXPORTING
* I_INTERFACE_CHECK = ' '
* I_BYPASSING_BUFFER = ' '
* I_BUFFER_ACTIVE = ' '
* I_CALLBACK_PROGRAM = ' '
* I_CALLBACK_PF_STATUS_SET = ' '
* I_CALLBACK_USER_COMMAND = ' '
* I_CALLBACK_TOP_OF_PAGE = ' '
* I_CALLBACK_HTML_TOP_OF_PAGE = ' '
* I_CALLBACK_HTML_END_OF_LIST = ' '
I_STRUCTURE_NAME = 'EKKO'
* I_BACKGROUND_ID = ' '
* I_GRID_TITLE =
* I_GRID_SETTINGS =
* IS_LAYOUT =
* IT_FIELDCAT =
* IT_EXCLUDING =
* IT_SPECIAL_GROUPS =
* IT_SORT =
* IT_FILTER =
* IS_SEL_HIDE =
* I_DEFAULT = 'X'
* I_SAVE = ' '
* IS_VARIANT =
* IT_EVENTS =
* IT_EVENT_EXIT =
* IS_PRINT =
* IS_REPREP_ID =
* I_SCREEN_START_COLUMN = 0
* I_SCREEN_START_LINE = 0
* I_SCREEN_END_COLUMN = 0
* I_SCREEN_END_LINE = 0
* I_HTML_HEIGHT_TOP = 0
* I_HTML_HEIGHT_END = 0
* IT_ALV_GRAPHICS =
* IT_HYPERLINK =
* IT_ADD_FIELDCAT =
* IT_EXCEPT_QINFO =
* IR_SALV_FULLSCREEN_ADAPTER =
* IMPORTING
* E_EXIT_CAUSED_BY_CALLER =
* ES_EXIT_CAUSED_BY_USER =
TABLES
T_OUTTAB = IT_EKKO
* EXCEPTIONS
* PROGRAM_ERROR = 1
* OTHERS = 2
.
IF SY-SUBRC <> 0.
* Implement suitable error handling here
ENDIF.
endmethod.
* <SIGNATURE>---------------------------------------------------------------------------------------+
* | Instance Public Method ZDEMO_CLASS->FETCH_DATA
* +-------------------------------------------------------------------------------------------------+
* +--------------------------------------------------------------------------------------</SIGNATURE>
method FETCH_DATA.
SELECT * from ekko into table it_ekko up to 2 rows.
endmethod.
ENDCLASS.
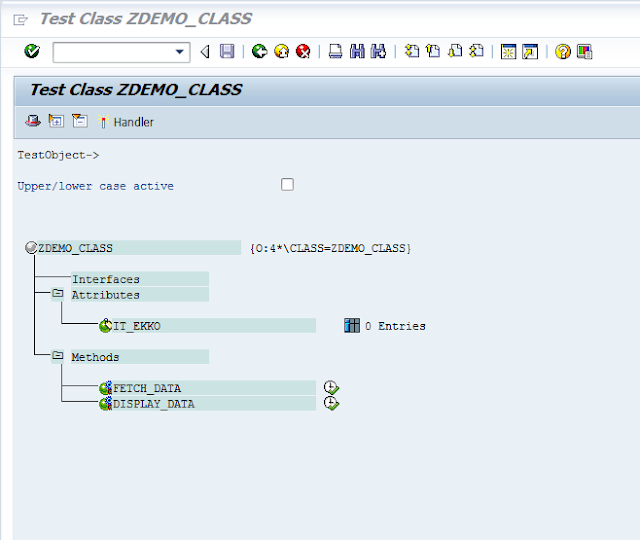
Execute the Display Method and you can see the following output.
Conclusion
If you know more about how to create a class in SAP ABAP? Please comment below or share this tutorial to help others.






Tutors On Call
ReplyDeleteTutors On Call provides help with learning. We have teachers who can teach you many subjects. Our tutors are here to make learning easy for you.